
Not everyone who does watercolor paints people. However, for those who do, the absolute number one question is – how do you blend skin tones in watercolor?
Now here’s the answer you probably don’t want to hear. There’s more than one way to do it. Actually, there are dozens of excellent ways to do it.
Just like with music, I borrowed a lick or two from this guy and a lick or two from that guy. After borrowing licks, runs, and phrases from enough people, I ended up with my own style.
The same applies to painting. The more you borrow, the more you develop your own style. So read this article and take notes. Take what you want from my style and throw out the rest. You’ll end up merging a bunch of styles together anyways when you’re developing your own unique style.
How I blend skin tones in watercolor
I’m going to show two examples of how I blend skin tones in watercolor. One example painting I just finished. The other, I finished awhile back. I do like how both of them turned out.
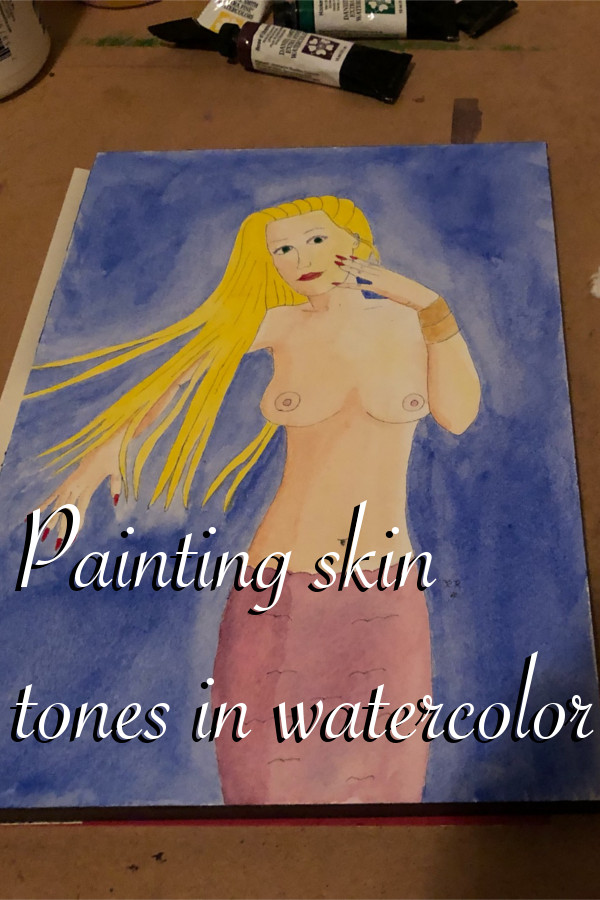
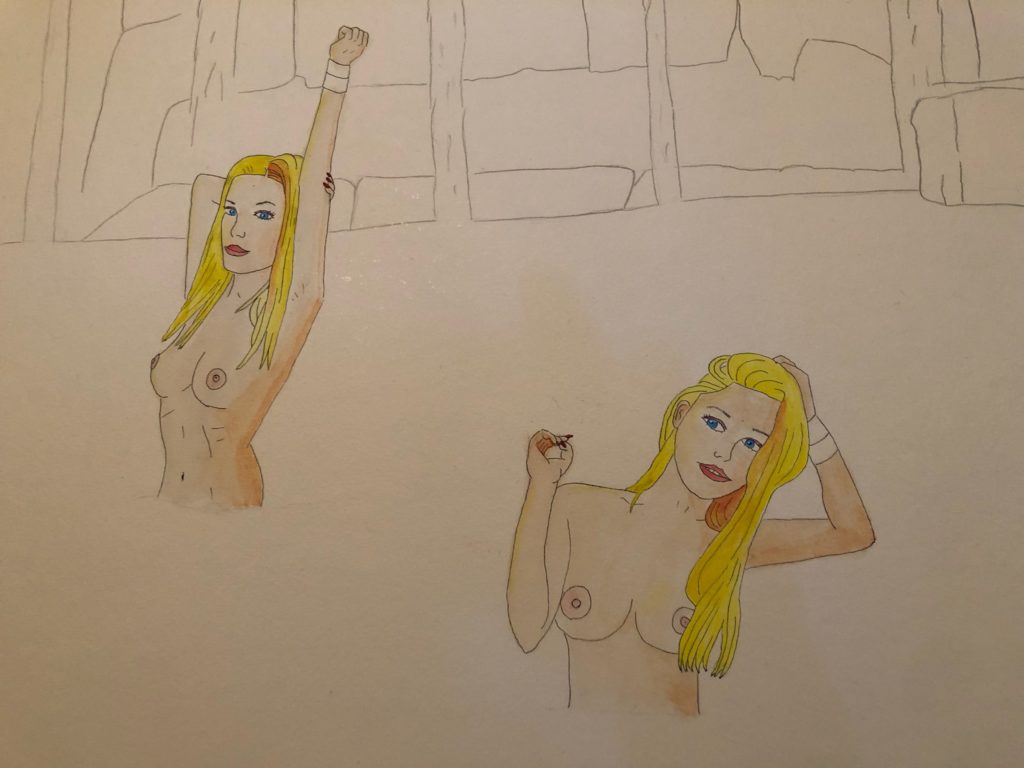
Mermaids and witches. I have no idea why they dominate my artwork. That’s just how it ends up. The featured image is a mermaid painting I just completed. The image below is a work in progress of two girls under a waterfall.
I primarily take two colors – titanium white and burnt sienna. I mix them until I get a nice light orange, matching Allie’s skin. Now if you look closely at someone, you’ll notice that nobody has just one color. You’ll see lots of colors.
The color you want to create is your model’s “average skin tone.” What the heck does that mean? Somewhere in the middle.
You’ll have to both darken and lighten it, depending on the lighting and shadows.
This method works for painting white people. To paint darker people, combine a nice red and a nice green about 50/50 to get a nice brown. You’ll have to lighten it or darken it to find that person’s average color. I personally use perelyne red and Hooker’s green to get my browns. I happen to like those two colors and combined, they get an excellent brown.
Mixing skin tones in watercolor – the four colors
We have two primary colors for my model’s main colors – titanium white and burnt sienna. What are the other two colors? A red and a yellow. Personally, my red is perelyne red and my yellow is hansa yellow medium.
I use the yellow to mark what will later become highlights. I love the yellow effect. It shows through without showing through. You have to look closely for it to see it.
For the final color, I add a little watered down red to her cheeks. I use the same red for her lips to her cheeks. Except for her lips, it’s straight up red (not watered down). I love red lipstick on a beautiful woman. It pops out and really makes her smile/lips stand out. I love that.
Darker skin
One of the prettiest girls I’ve ever painted was a Caribbean girl. Beautiful dark skin. I used a combination of perelyne red and Hooker’s green for her shadowings and used a lot of burnt sienna for her main color, then used titanium white and burnt sienna for her highlights. She loved the painting I did of her.
Like I’ve said, more than one way to do things. If it looks good to your eyes, you’re doing it right. If it looks bad, then keep doing slight modifications until it looks good.
You’re most likely not going to get it right the first time. It took me about a dozen attempts to get my skin colors to look good. Keep at it if you’re struggling!
Seven wet on wet layers
I get really soft skin tones by painting seven layers wet on wet. (I hope you’re using really good watercolor paper, because with cheap watercolor paper, you may be pushing it beyond its limits).
The first layer – I paint yellow for the highlights and I paint the main skin tone everywhere else. Then the second layer, the third layer, and the fourth layer, I paint the main skin tone everywhere.
For the fifth layer, I paint the skin tone for the non-shadowed areas while painting slightly watered down burnt sienna on the shadowed areas. For the sixth layer, I smear the regular color all over her and drop a little watered down red for her cheeks. Finally, for the seventh layer, I paint straight up titanium white all over her to even out everything and smooth out both the lightened areas and the shadowed areas.
- Titanium White
- Burnt Sienna
- Yellow Hansa Medium
- Perelyne Red
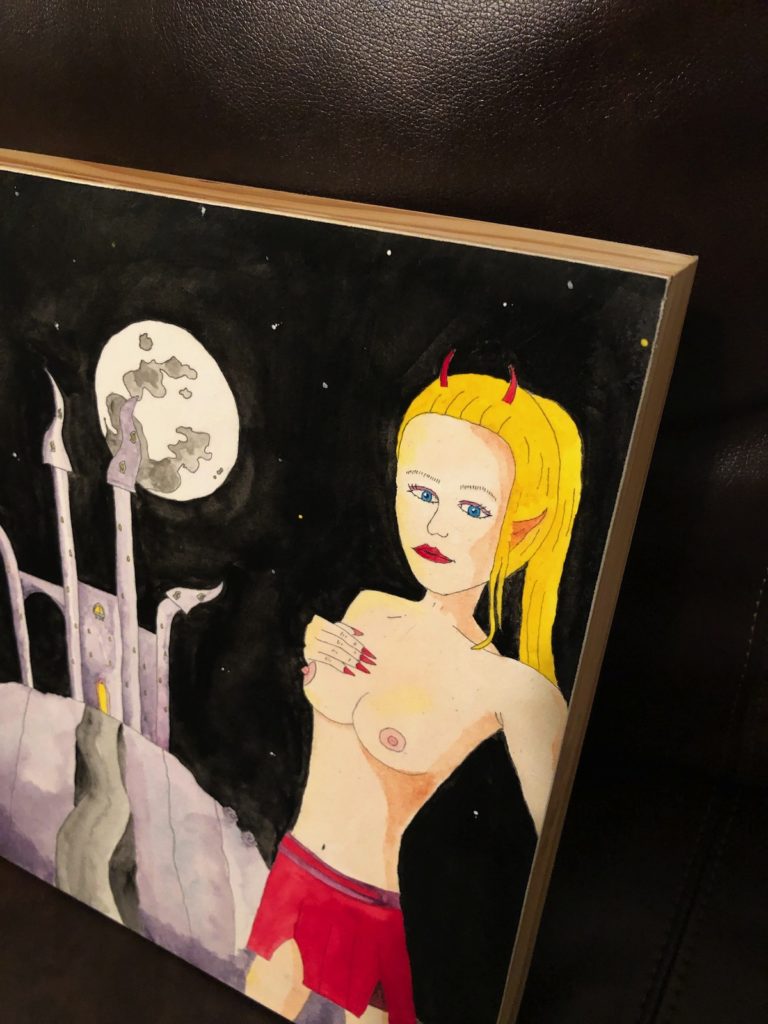
Lighter skin
For the succubus below, once again this is Allie. But a Succubus lives in Hell and only appears in dreams. Hopefully not yours because they’re very dangerous creatures!
Anyways, she doesn’t get any sunlight. So I’m going to paint her lighter.
Two ways to do this:
- You mix a lighter mix with more titanium white and less burnt sienna.
- Rather than doing the final layer of titanium white, you do less layers of the mix and replace them with titanium white layers.
You’ll also note I exaggerated a lot of her features. When painting mystical creatures like Succubi and Fairies, you don’t want to copy human anatomy perfectly since they’re not human.
There’s more than one way to do anything
You may try my techniques and hate them. That’s perfectly fine. Like I said before, sometimes different people’s techniques clash and don’t play well together at all. That’s part of being human. If my stuff doesn’t work for you, I’m not at all going to take it personal. However, if you may take one thing out of this entire blog post and run with it for the rest of your painting career, I’d be flattered.
I’ve also heard some watercolor purists poo poo on the idea of using white watercolor for anything. Whatever. I don’t like rules.
I actually love mixing with titanium white. You get really weird mixes with it.
I initially tried getting skin tones with red and yellow. However, that combo caused me to throw out a lot of paint before getting the right formula.
With titanium white and burnt sienna, it’s very simple. Take the white, add some water, and add a little bit of burnt sienna until you get the right mix, depending on how light or dark your model is.
I like simple. Simple is good. Even better than simple? Easy to replicate.
When I run out of the mix, I don’t have any problem replicating the same colors, despite mixing colors being one of the hardest things to master in watercolor.
Thank you wow I learn from you! Again and again I say thank you!
You’re most welcome! I love to teach everything I know.