Do you need to know how to mount watercolor paper onto wood
The good news – it’s easy. The bad news – it’s time consuming and a lot can go wrong. But don’t worry, we’ll walk through the process step-by-step.
Afterwards, we’ll tell you how to preserve your watercolor painting. That’s another article though. I’ll put the link at the end of this article as well.
(Note that this works for both watercolor and gouache, assuming you’re using watercolor paper).
The benefits
After you mount watercolor paper on wood, assuming you’re using a cradled piece of wood, it’s already ready to hang up. You can decide to frame it later. Or, you can hang it up as is.
Either way it’s going to look great. Some folks prefer art framed. Some don’t. It’s personal opinion.
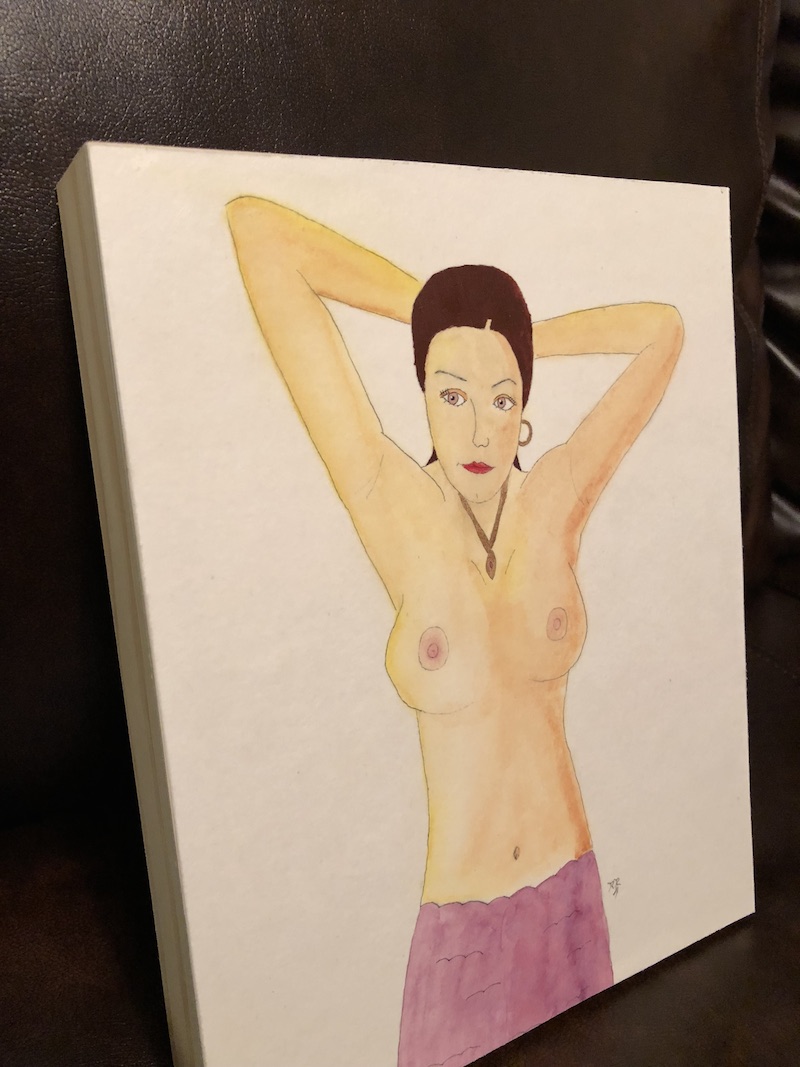
When it’s finished, it will look like this. I used my leather couch as the backdrop.
Item list
You’ll need the following tools:
- Something to cut the paper on (I simply use a real large cutting board)
- An X-Acto knife
- Cradled wood so it could be hung up immediately
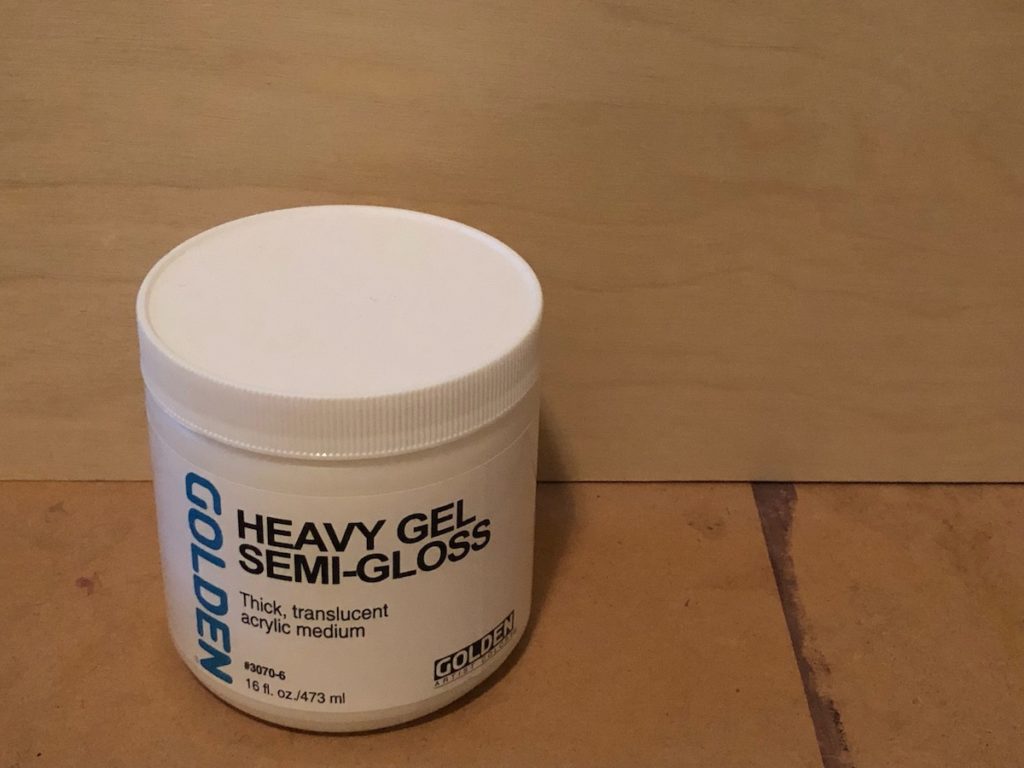
- An adhesive
- sandpaper
- An old brush
The cutting board, you can pick up at a garage sale or a secondhand store. You probably don’t want to use the one you’re eating from. As for the brush, either use an old one or a cheap one. This brush won’t be usable for painting any more. You might already have sandpaper lying around.

Planning
There’s an old saying in carpentry. Measure twice, cut once. You only get one chance at this so you have to make it right.
You’re going to cut your painting and you may lose an inch of margin. I’ve already planned out in advance as I’m actually painting, so I don’t lose anything of value.
You should actually measure with a ruler your painting area vs the piece of wood you’re going to put it on. You’ll have to do this if you decide to frame it anyways.
So have a plan in advance where you’re going to make the cuts. It will save you heartache in the future.
Measure
OK, the fun part. Measure the wood vs measure what part of the painting you’ll be keeping. Note that when I actually make the cut, the painting is already glued to the wood. But I know in advance what I’m keeping and what I’m losing.
This is a very important step. Do not neglect this. You may lose a piece of your painting that you’re emotionally attached to if you don’t plan and measure correctly.
For instance, for a 9″x12″ painting, you’re probably going to buy the 8″x10″ piece of wood. You’ll be losing one total inch horizontally and two total inches vertically. Or vice versa, depending on whether your painting is landscape or portrait.
Clean, then glue the wood
Before I even glue the wood, I make sure it’s pretty clean. You don’t want dirt or dust interfering with the glue. After all, you’re an artist and you want this piece to last for hundreds of years. I can’t speak for you, but I take that mentality quite seriously. I assume you do too.
Now, I assume you already know in advance where you’re going to cut. So now glue the wood. I use an old paintbrush.
Very important! Err on the side of too much glue rather than not enough. Trust me on this one. Nothing more annoying than the next day to see a corner pop up because you didn’t use enough glue.
Make sure the edges are glued well. Also make sure you’ve glued the corners well.
What’s the brush for?
The brush is to even things out. If you have way too much glue, you’ll see a little glue bump in your painting after it’s glued and dried. Whereas this may not be a big deal to some folks, it may drive you nuts. Thus, the brush.
So be sure to brush it down and even it out. Make sure there’s an even layer of glue throughout the wood. And do this relatively fast as we’re dealing with glue.
Stick the painting on
Fun part. I hope you planned well.
This is where you actually stick the painting on the glued wood. Like I’ve mentioned already, you’re going to lose the parts of the painting that don’t fit on the wood. We’ll be cutting them off with your knife.
Once you’ve stuck the painting on the wood, make sure it’s on there well. This is where I hope you’ve had preschool experience. Remember preschool?
This isn’t a joke. A lot can go wrong at this stage. If you’ve never had preschool, you should practice gluing paper onto something else. And once again, this isn’t a joke. You can ruin your painting at this stage. You only get one chance to do this.
You’ll need the painting to stick for the next few hundred years. We’re using pretty good adhesive. This is what professional artists use, and it’s the right formula that it won’t damage your watercolor paper either.
The cut
You’ll need to let your painting dry overnight. I put the painting on a wood table and put heavy books over it because I want the gluing stage to work. I’ve made the mistake once of not gluing a corner correctly. Note, once. I’m telling you this so you don’t make the same mistake.
The next morning, grab your painting. It should be glued on the wood well. Congratulations! You’ve been successful at the hardest part. However, before we pop open the champagne, we still have to make the cut.
This is where I hope you’ve had high school art. If you’ve never used an X-Acto knife, you need to practice first. Don’t take this step lightly because if you screw up the initial cut, you better be really good with sandpaper.
Now put the painting face down onto your cutting surface. Cut with your X-Acto knife around the edges, as close to the edge as you possibly can. Once again, if you’ve never used an X-Acto knife before, practice on something that isn’t important first. You get one chance to do this.
Once this is done, simply sandpaper the edges and it’s ready to be preserved. Oh, wipe away the dust with a soft brush. I assume you already have plenty of those.
After you mount watercolor paper on wood
You’ll now need to preserve your watercolor painting. I wrote a separate article for that since I don’t like to cram too much information into one article. I don’t know about you, but my head hurts if I get too much information. That’s why I like to break things down.
After I’ve preserved my paintings, I make a cold, hard decision. If it’s an A, I put it on the store. If not, I give it to a friend.
I sincerely hope this helps and let me know if you have any questions.
[convertkit form=4916024]

Do you ever paint on the paper after its been attached to the wood? I am looking at a method that will allow me to attach the paper and then work on it.
That may come unglued. I haven’t tried it though so I honestly don’t know.